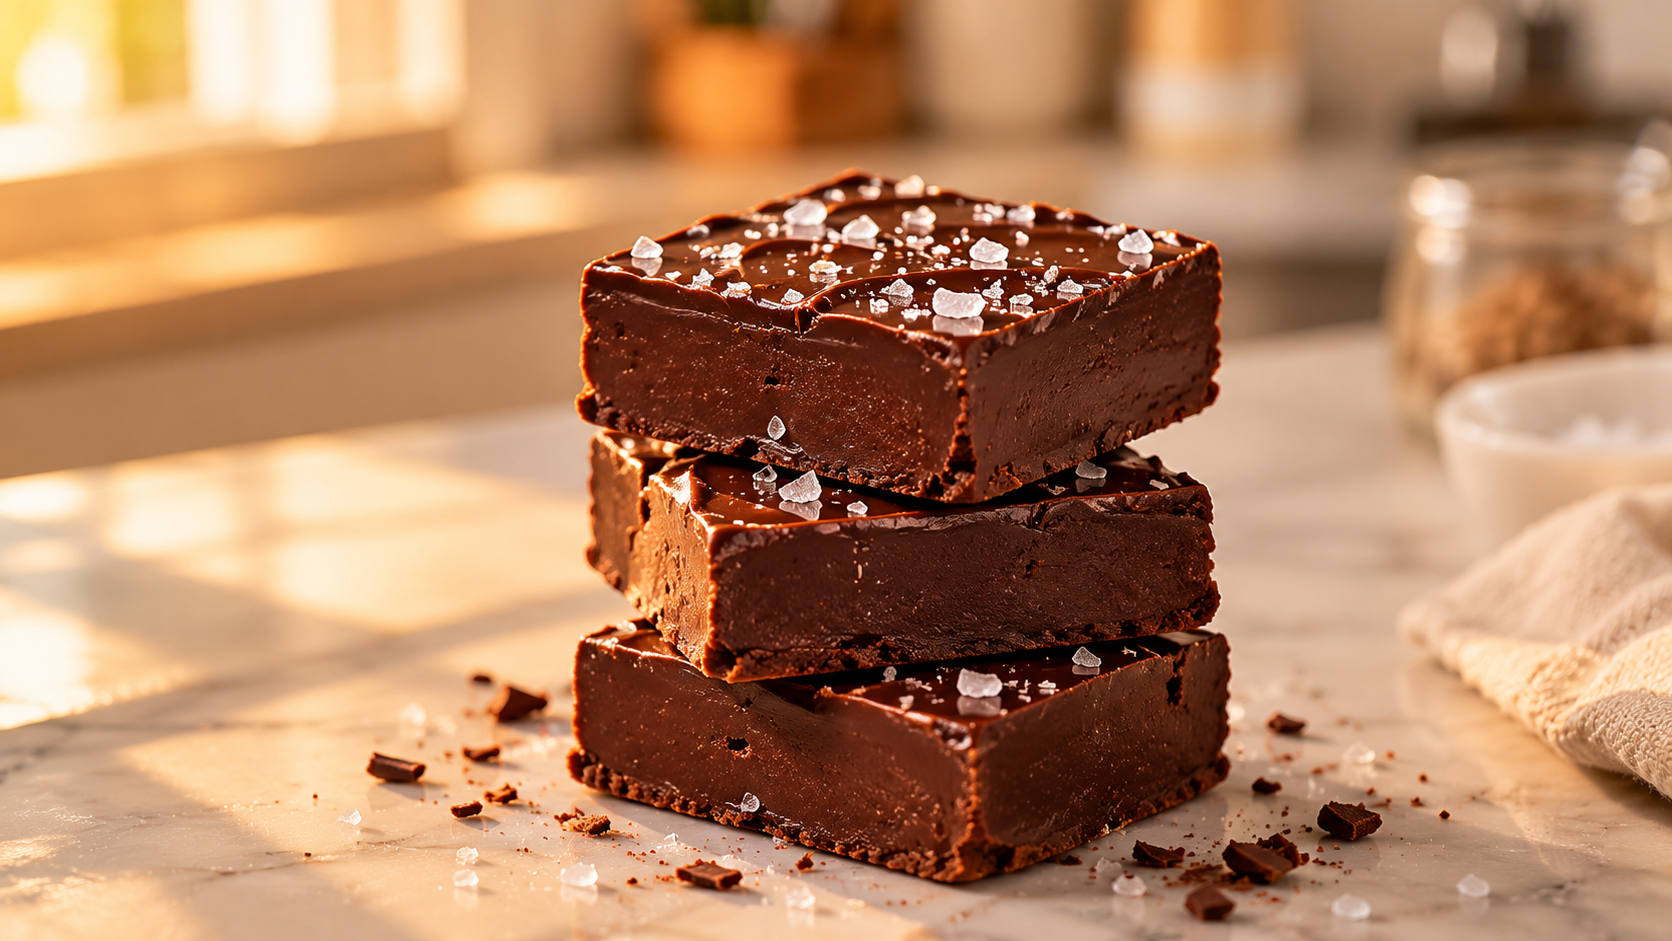
3-Ingredient Fudge That Actually Tastes Like You Tried
Chocolate chips, sweetened condensed milk, and a pinch of salt. Melt it, pour it, chill it — done. The hardest part is waiting for it to set.
Okay, I’ll be honest — I used to think homemade fudge was one of those things that required a candy thermometer and a whole Saturday afternoon. Then I made this version and I genuinely laughed at how simple it was.
Three ingredients. That’s it. Chocolate chips, sweetened condensed milk, and a tiny pinch of salt. You melt it, pour it, chill it, and you’re done. The hardest part is waiting for it to set.
I make this every holiday season without fail. It started because I needed something for a neighbor’s cookie tray and had nothing fancy on hand. Now my family asks for it year-round, which honestly tells you everything you need to know.
If you’ve been intimidated by homemade fudge before, this easy 3-ingredient fudge is going to feel like a revelation.
Why You’ll Love This Recipe
- Only 3 ingredients — no fancy equipment, no stress
- Ready in under 2 hours (most of that is just chilling time)
- Rich, creamy, and deeply chocolatey — it tastes way more indulgent than it should
- Budget-friendly — you probably already have everything at home
- Perfect for gifting — slices beautifully and looks gorgeous on a plate
- No candy thermometer needed — seriously, none
Step-by-Step Instructions
-
1Line your pan. Grab an 8×8 inch baking pan and line it with parchment paper. Leave some overhang on the sides — this makes it so much easier to lift the fudge out later.

-
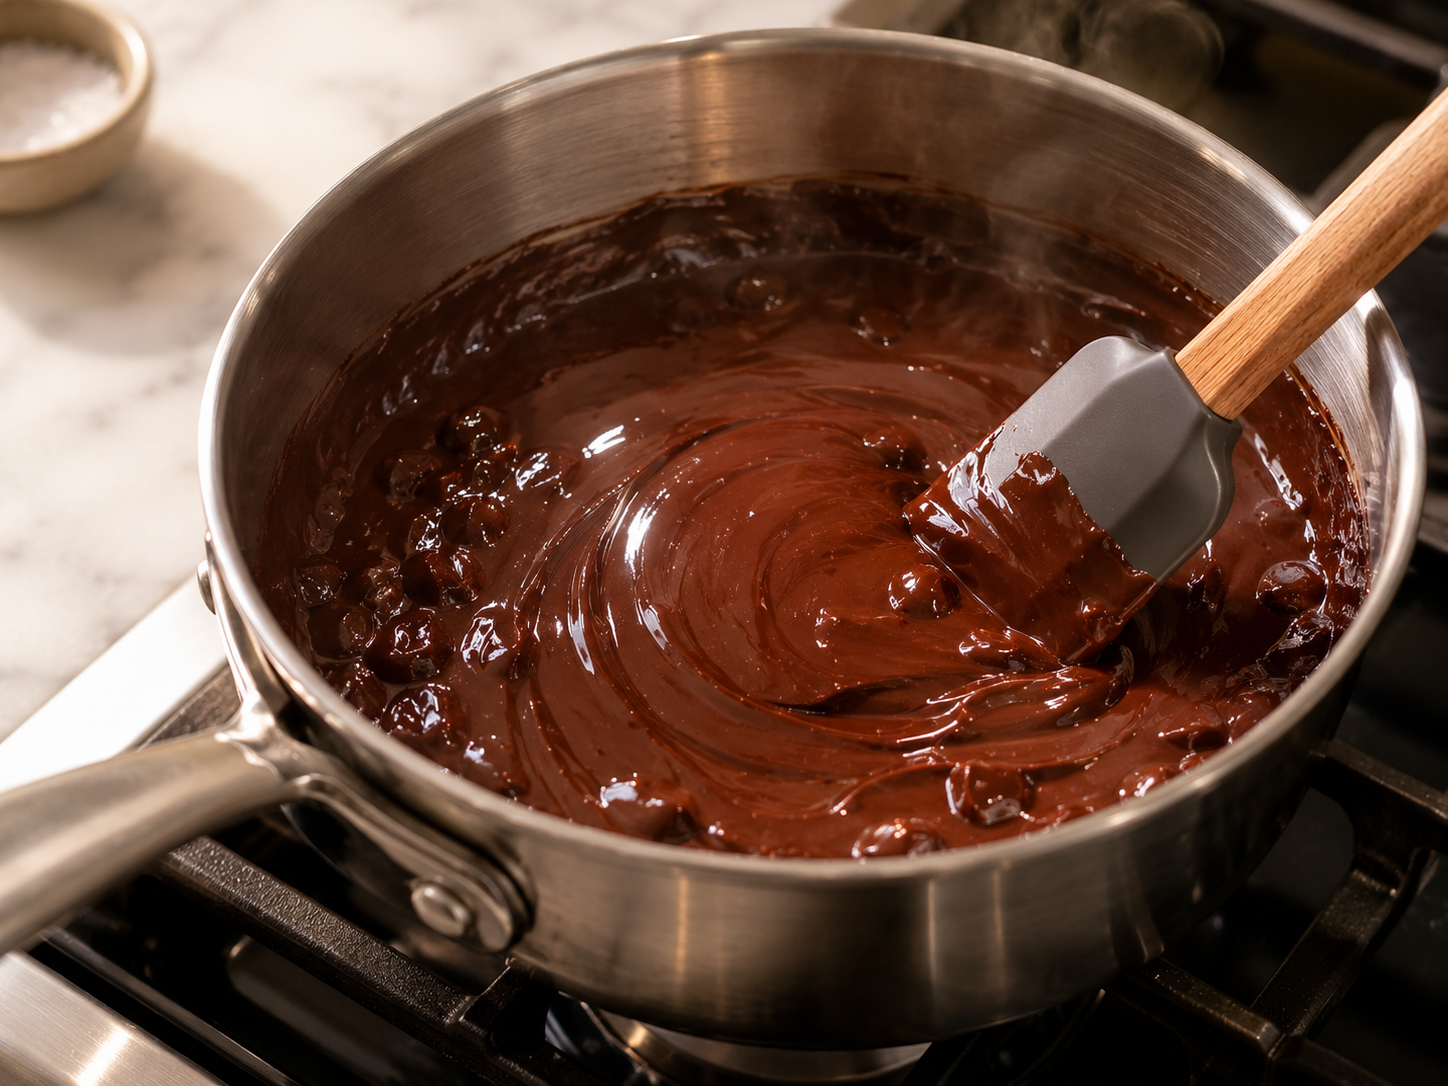
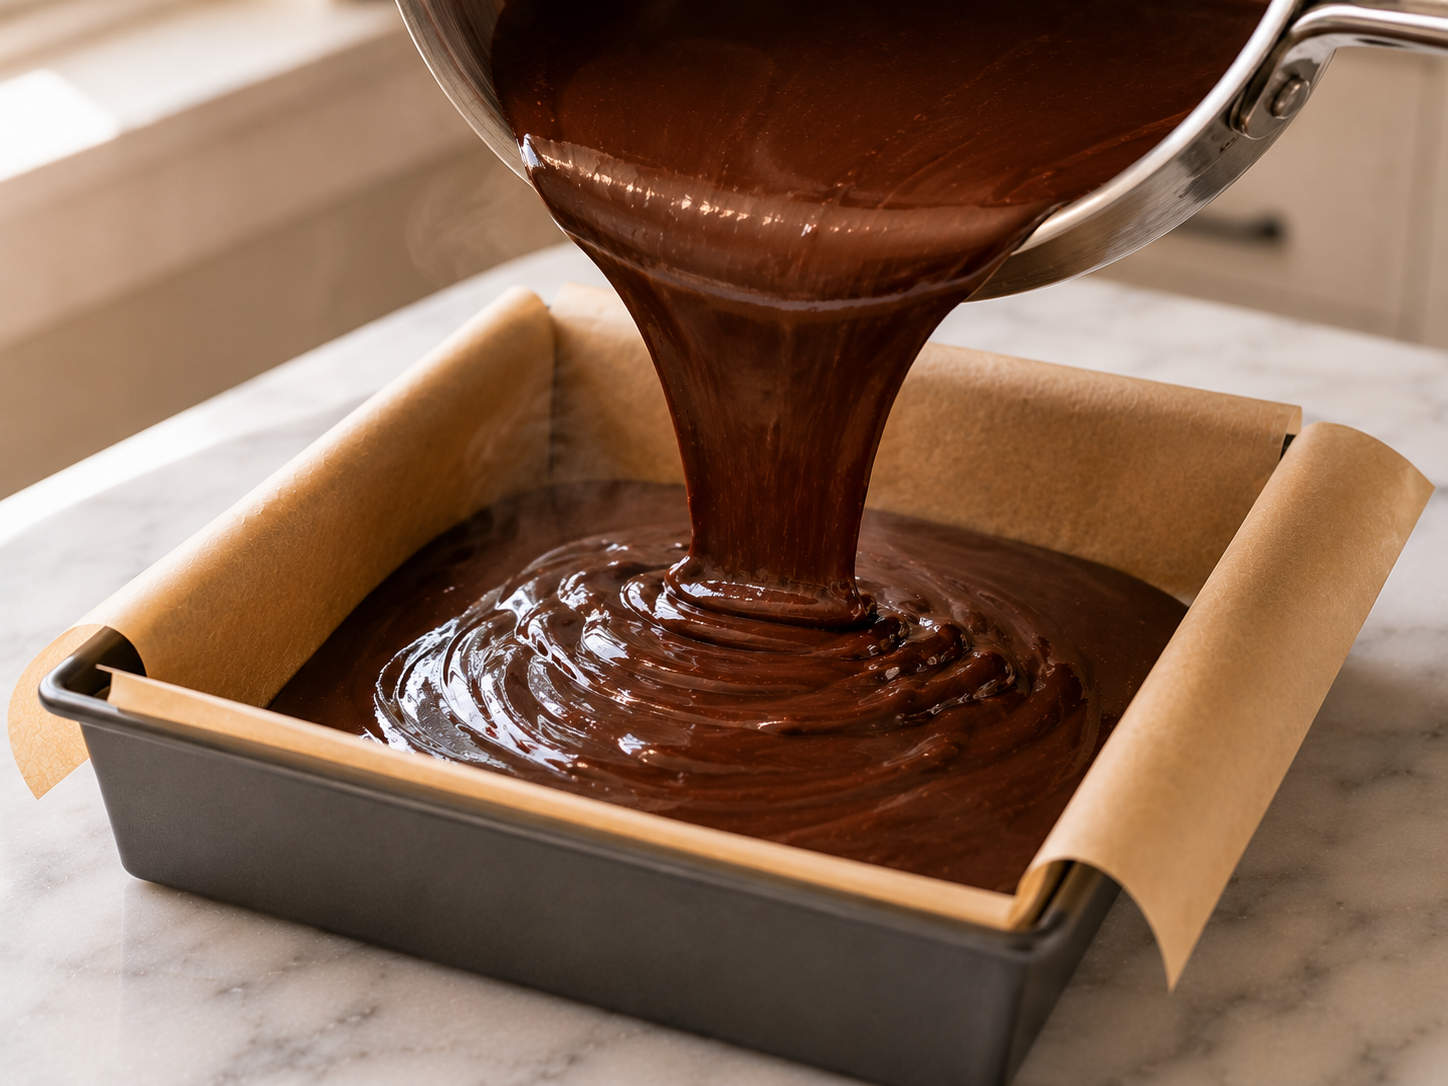
2Melt your chocolate. Pour the chocolate chips and the sweetened condensed milk into a medium saucepan. Set the heat to low and stir constantly until everything is smooth and glossy — about 3–5 minutes. Don’t rush it or walk away.⚠️ Keep the heat low and patient. High heat causes the chocolate to seize up and turn grainy — once that happens it’s very hard to fix.
-
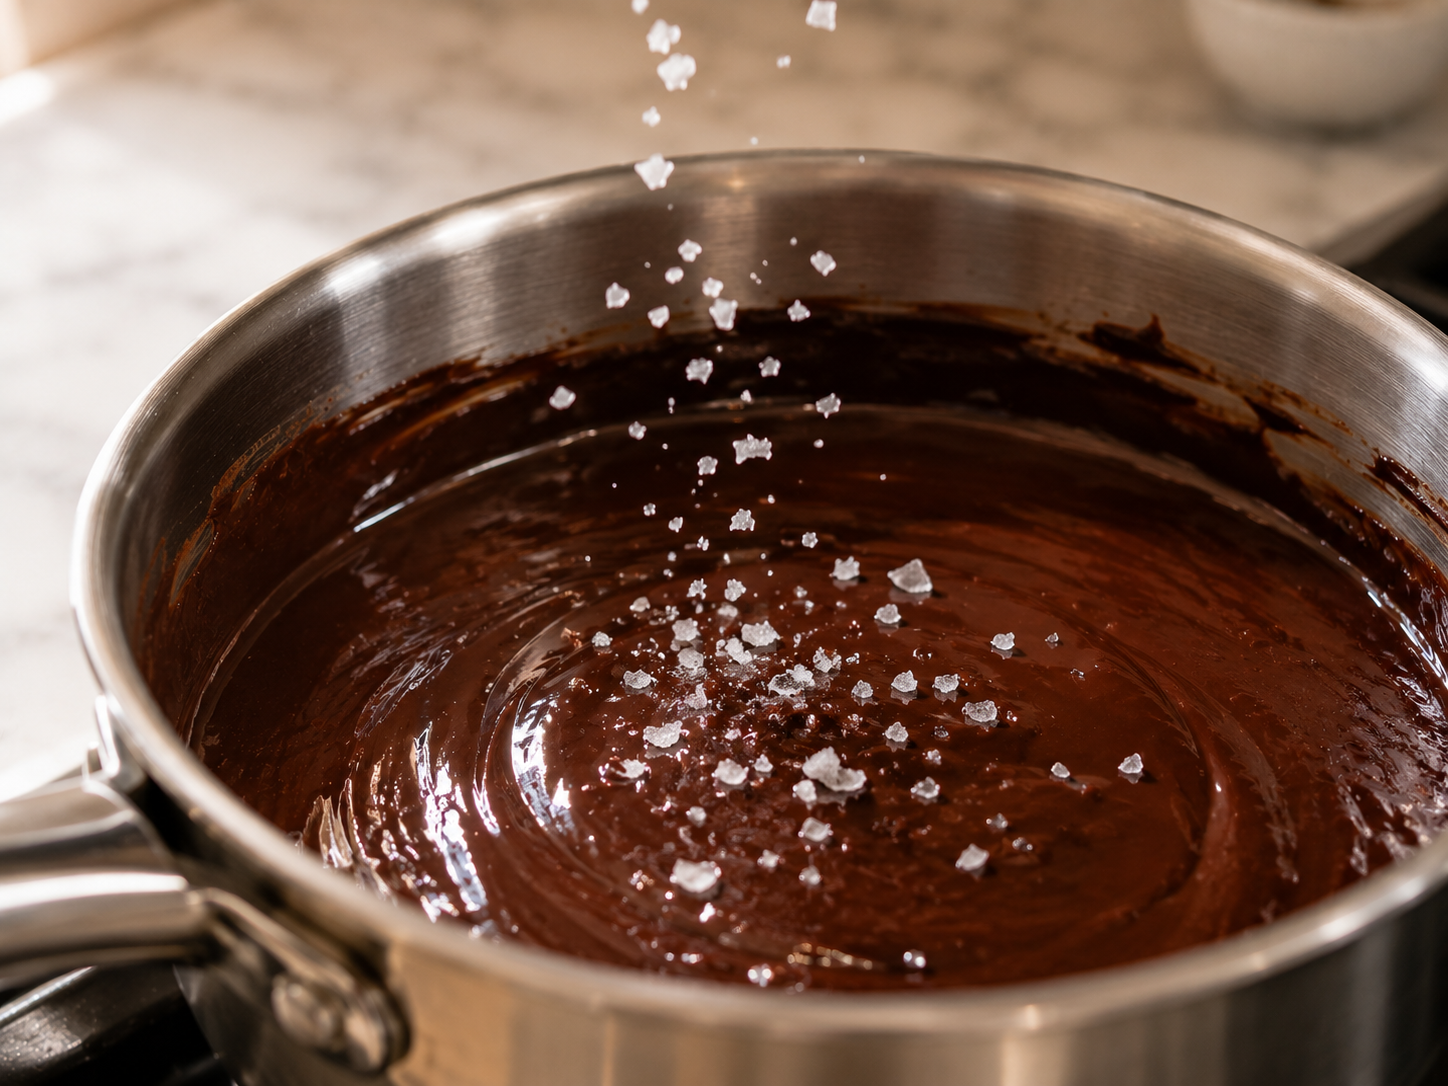
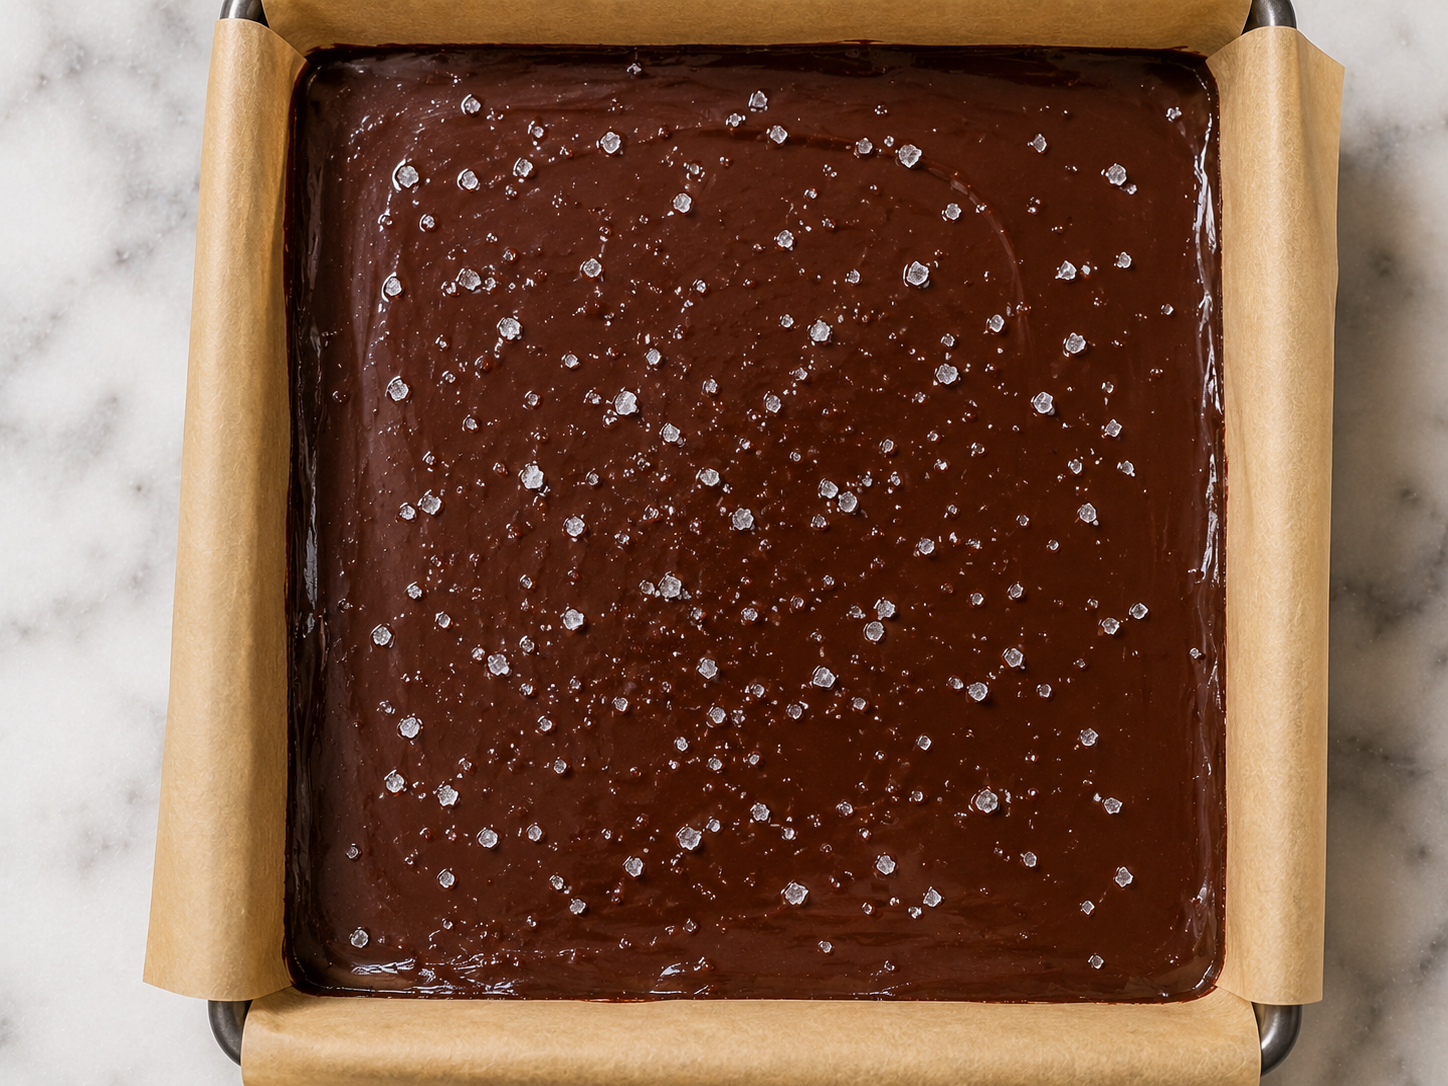
3Add salt (and vanilla if using). Once the mixture is completely smooth, stir in the salt and vanilla. Give it a good stir so it’s fully combined.💡 Even if you’re not topping with flaky salt, the small amount stirred in makes the chocolate taste richer and more complex. Don’t skip it.
-
4Pour into the pan. Pour the fudge mixture into your lined pan and use a spatula to spread it evenly. Tap the pan gently on the counter a couple of times to smooth out the top.
-
5Add toppings (optional). Now’s the time to add flaky salt, nuts, sprinkles — whatever you like. Press them in lightly so they stick.
-
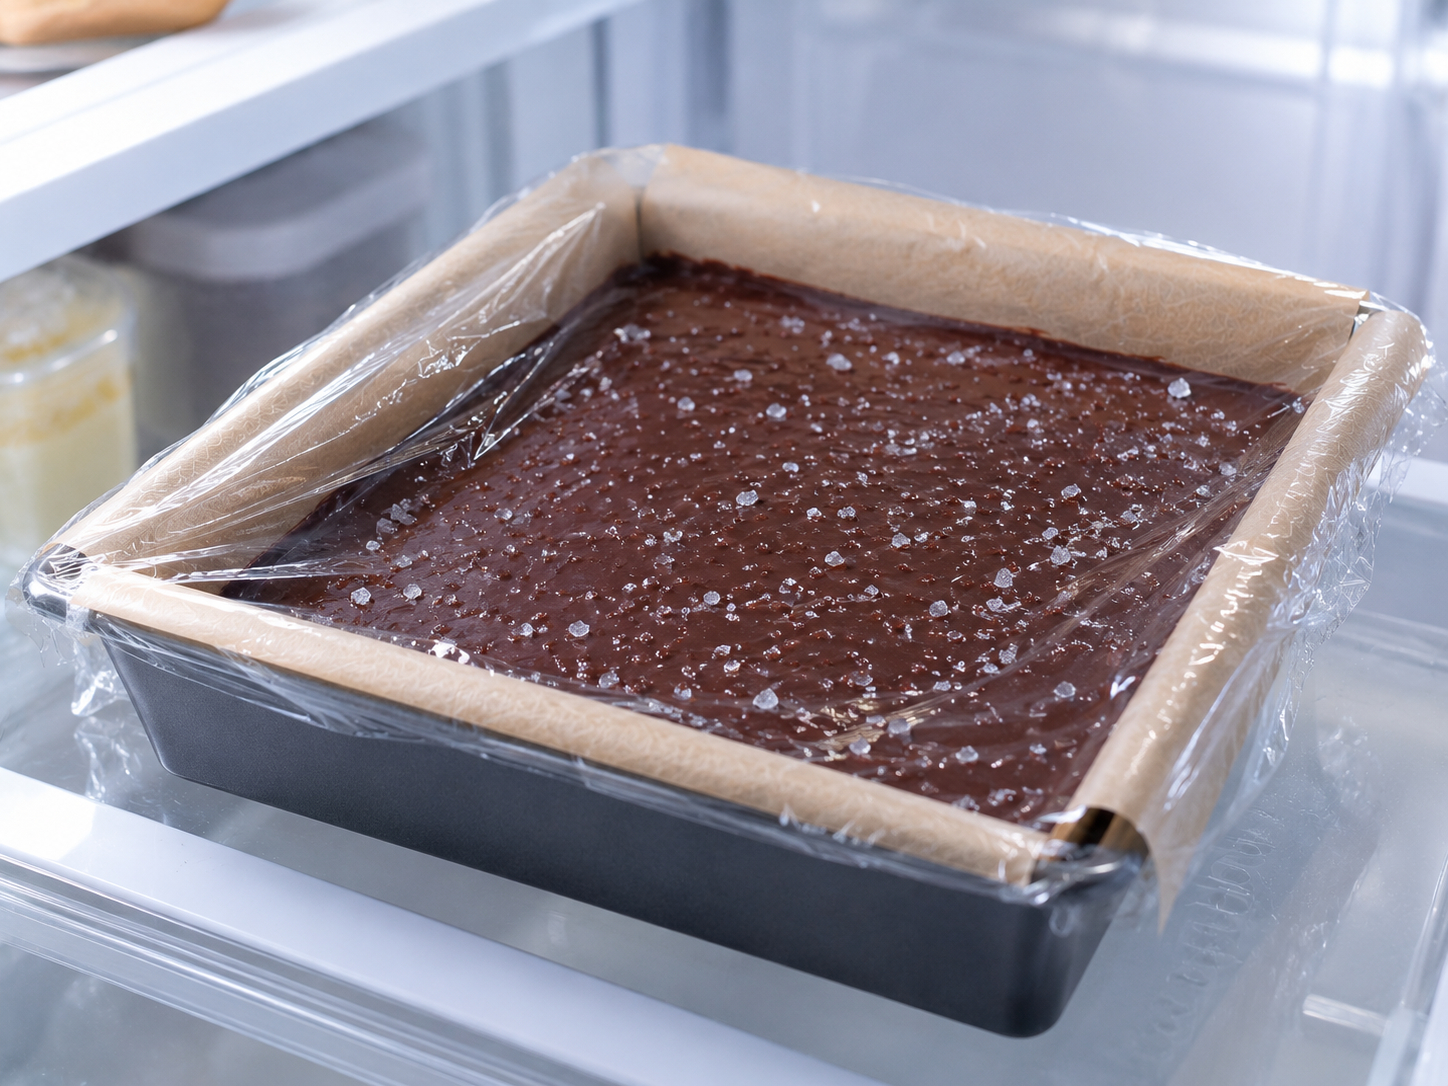
6Refrigerate. Pop the pan in the fridge for at least 2 hours, or until fully set. Leaving it overnight gives you a perfectly firm fudge every time.💡 If it’s still soft after 4 hours in the fridge, pop it in the freezer for 30 minutes. It usually firms right up.
-
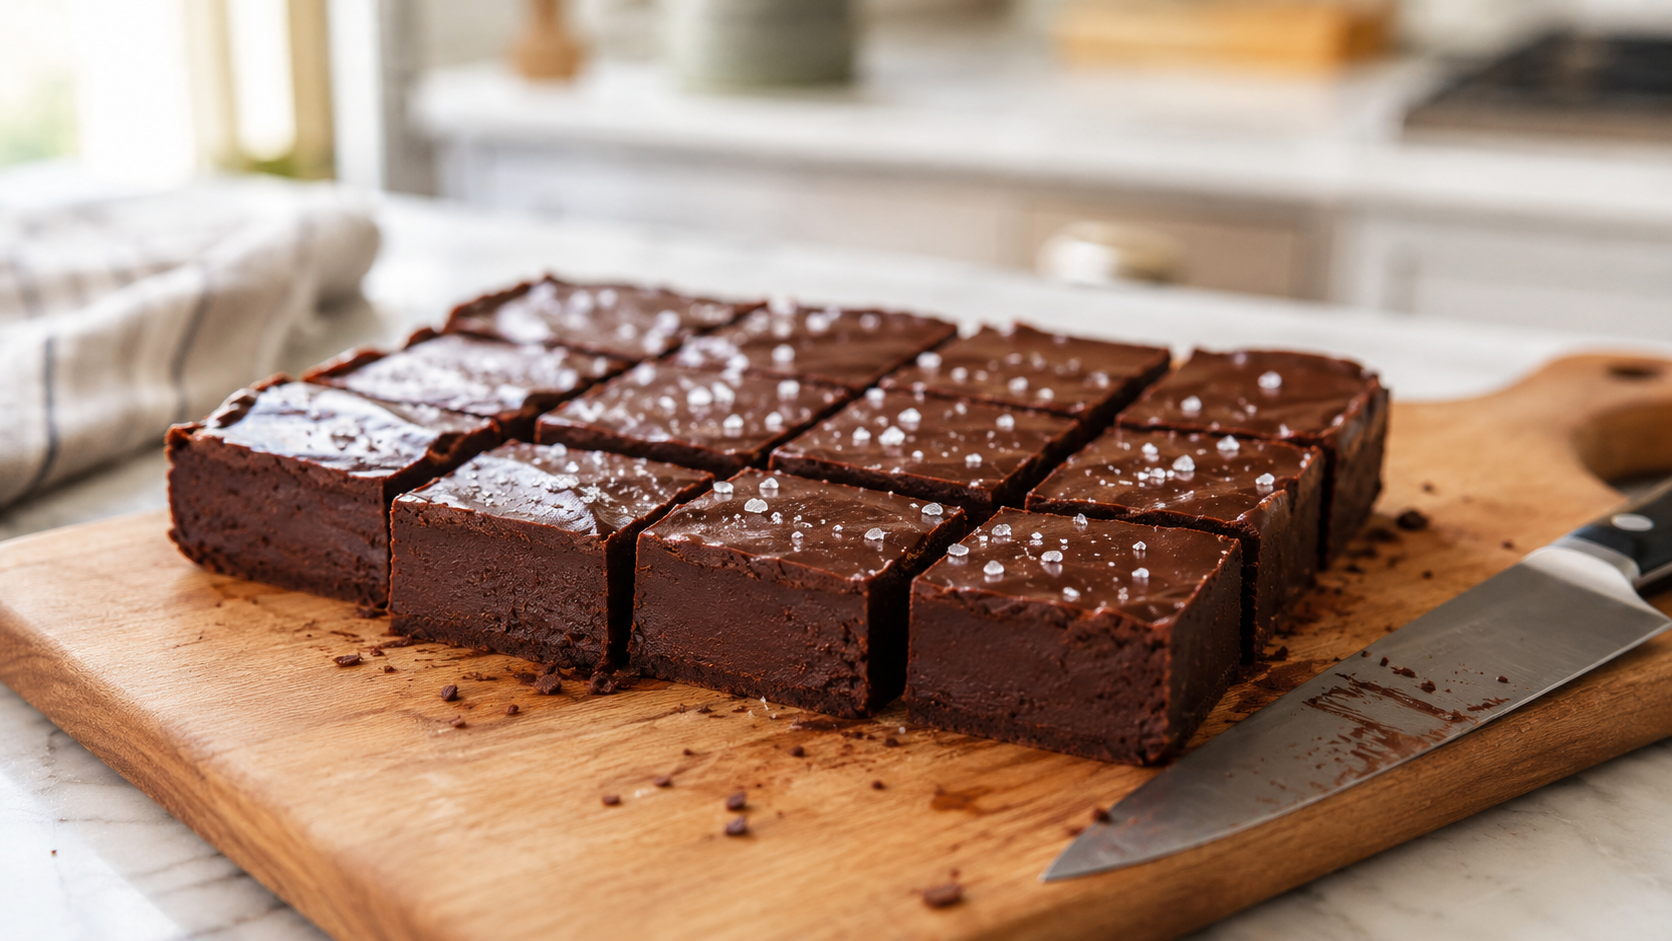
7Slice and serve. Lift the fudge out using the parchment paper edges. Place it on a cutting board and cut into small squares. A warm knife — run it under hot water and dry it — gives you the cleanest cuts.💡 Let the fudge sit at room temperature for about 10 minutes before serving. Straight from the fridge it’s very firm — a few minutes out and it gets that soft, melt-in-your-mouth texture.
Private: 3-Ingredient Fudge That Actually Tastes Like You Tried
🧄 Ingredients
- 340 ¾ g semi-sweet chocolate chips
- 396 ¾ g sweetened condensed milk
- 1 ¾ tsp fine sea salt
📋 Instructions
-
1
Line an 8x8 inch baking pan with parchment paper, leaving overhang on the sides for easy removal. Set aside.
💡 Don\'t skip the parchment — it makes lifting the fudge out so much easier. -
2
Add the chocolate chips and sweetened condensed milk to a medium saucepan. Heat over low, stirring constantly, until the chocolate is fully melted and the mixture is smooth and glossy.
💡 Keep the heat low and don\'t walk away — chocolate can burn quickly on high heat. -
3
Remove from heat and stir in the fine sea salt (and vanilla extract if using). Mix until fully combined.
💡 Salt balances the sweetness and makes the chocolate flavor taste richer. -
4
Pour the fudge mixture into the prepared pan. Use a silicone spatula to spread it evenly. Tap the pan on the counter a couple of times to level the surface.
💡 Work quickly while the fudge is still warm and spreadable. -
5
Add any optional toppings now — flaky sea salt, crushed nuts, or sprinkles. Press them in lightly so they adhere to the surface.
💡 Flaky salt on top is a simple upgrade that makes a big difference. -
6
Refrigerate for at least 2 hours, or until the fudge is completely firm and set.
💡 For best results, refrigerate overnight. The texture is perfect the next day. -
7
Lift the fudge out of the pan using the parchment overhang. Place on a cutting board and slice into small 1-inch squares using a warm, dry knife for clean cuts.
💡 Run your knife under hot water and wipe dry before each cut for the cleanest edges.
Nutrition Per Serving
💡 Pro Tips
- Low and slow on the heat. High heat can make the chocolate seize up and turn grainy. Keep it low and patient — 3 to 5 minutes of gentle stirring is all it takes.
- Use good chocolate chips. This recipe is so simple that the chocolate flavor really shines through. Semi-sweet is classic, but dark chocolate chips are amazing here too.
- Don’t skip the salt. Even if you’re not topping with flaky salt, the small amount in the fudge itself makes the chocolate taste richer and more complex.
- Warm knife for clean cuts. Run your knife under hot water, wipe it dry, then slice. It makes a real difference for pretty, even squares.
- Let it come to room temp before serving. Straight from the fridge it’s firm, but 10 minutes at room temp and it gets that soft, melt-in-your-mouth texture.
- Double the recipe if you’re making this for a crowd. It scales perfectly and an 8×8 goes fast.
Variations to Try
Swap semi-sweet chips for dark chocolate chips (60–70% cacao). It’s a little more intense and honestly kind of addictive. Top with flaky sea salt.
Once poured into the pan, drop small spoonfuls of peanut butter on top and swirl with a toothpick. The combination is everything.
Add ½ tsp peppermint extract instead of vanilla. Top with crushed candy canes for a holiday version that looks gorgeous on a cookie tray.
Stir in mini marshmallows and chopped walnuts right before pouring into the pan. Classic, cozy, and always a crowd-pleaser.
Serving Ideas
- Cut into small squares and arrange on a pretty plate or wooden board
- Wrap individual pieces in parchment and tie with twine for gifting
- Serve alongside fresh strawberries or raspberries — the fruit cuts through the richness beautifully
- Add to a holiday dessert platter with cookies and bark
- Box up for teacher gifts, neighbor gifts, or hostess presents — it travels well and looks homemade in the best way
Storage
| Where | How long | Notes |
|---|---|---|
| 🌡️ Room temp | Up to 3 days | Airtight container — works well if your kitchen isn’t too warm |
| ❄️ Fridge | Up to 2 weeks | Airtight container with parchment between layers — let come to room temp before serving |
| 🧊 Freezer | Up to 3 months | Wrap pieces individually in plastic wrap, then into a zip-lock bag — thaw in the fridge overnight |
Frequently Asked Questions
Honestly, this 3-ingredient fudge has saved me so many times. Last-minute holiday gift? Done. Craving something sweet after dinner? Done. Needed something to bring to a potluck and had no time? Done.
It’s one of those no-bake desserts that feels like cheating but tastes completely homemade. The kind of thing people ask for the recipe and look slightly shocked when you tell them how simple it is. If you make it, drop a comment below or tag me — seeing your fudge squares genuinely makes my day. Now go make a batch. You deserve a treat. 🍫

Get new recipes in your inbox 🍋
No spam — just the good stuff, straight to you.