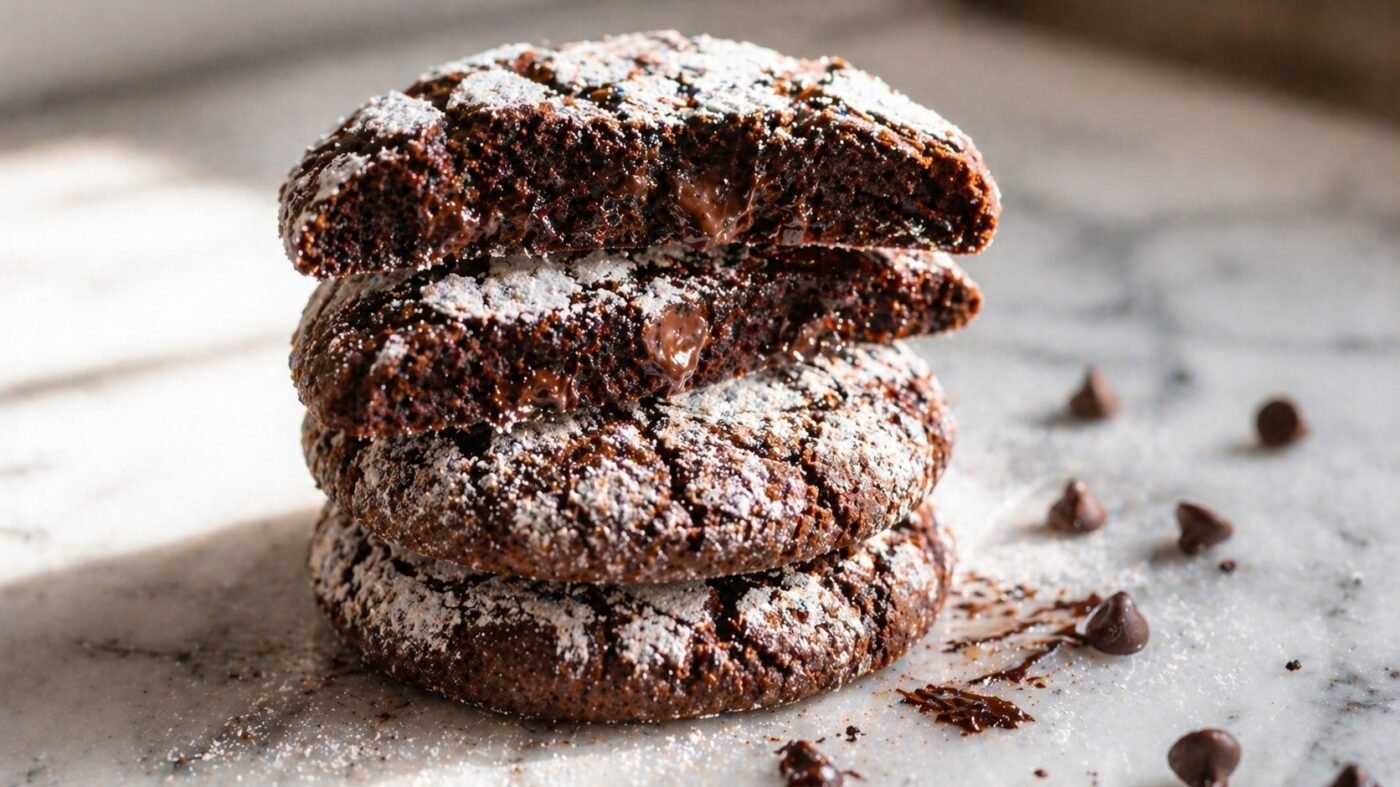
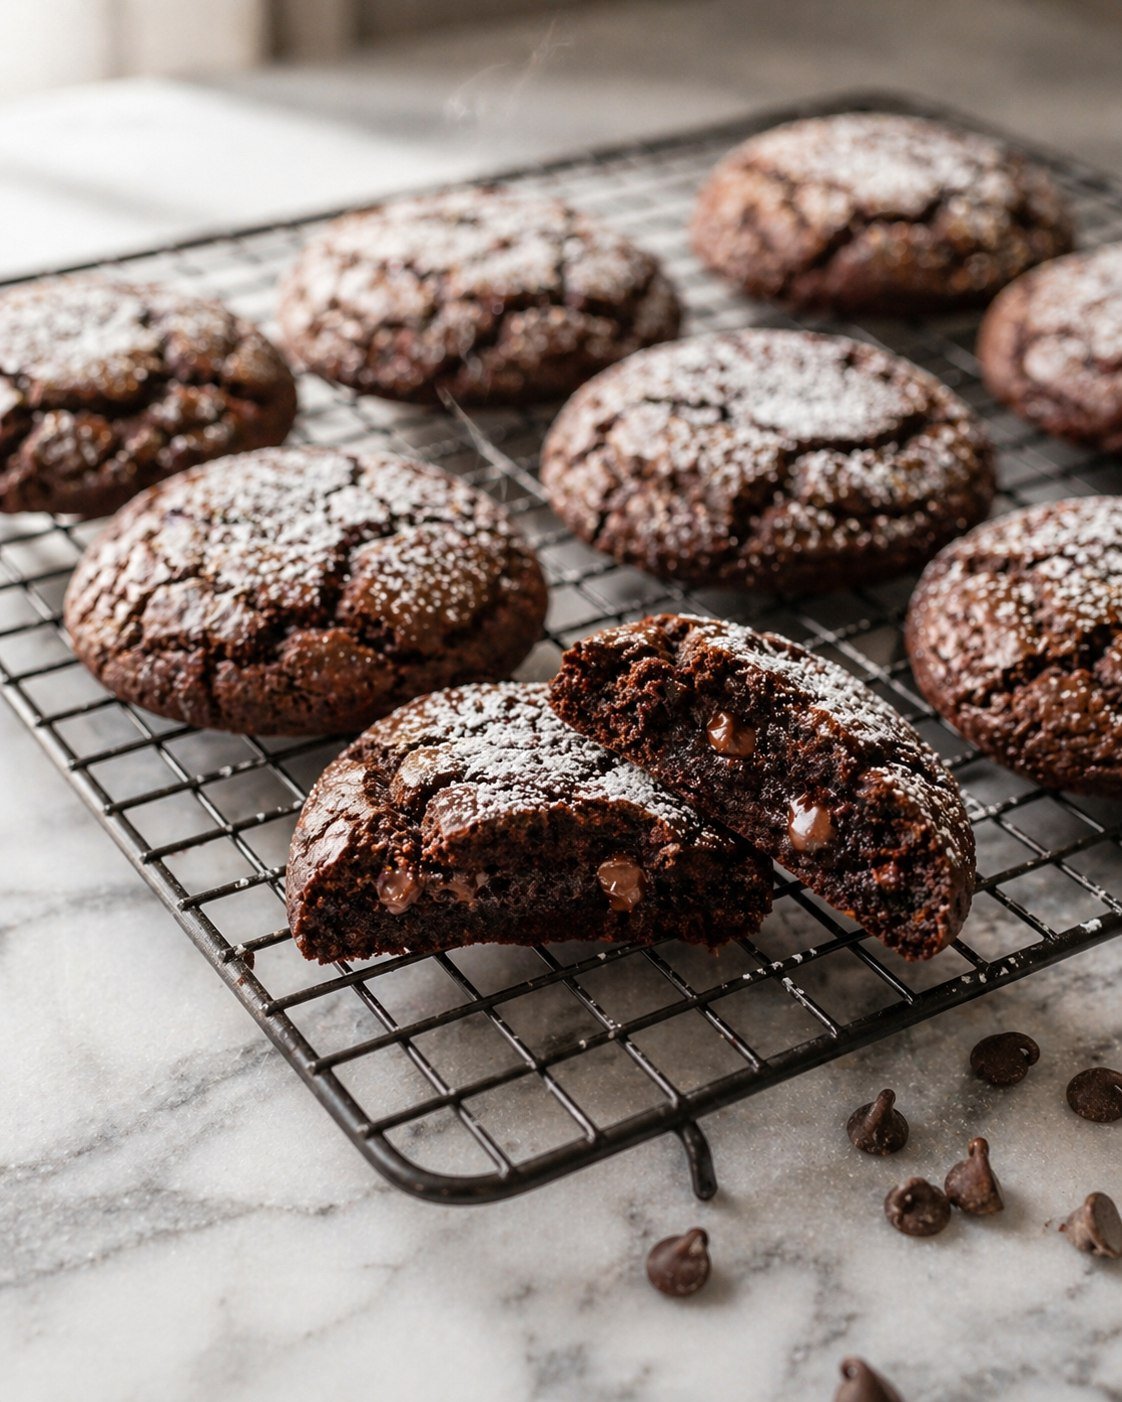
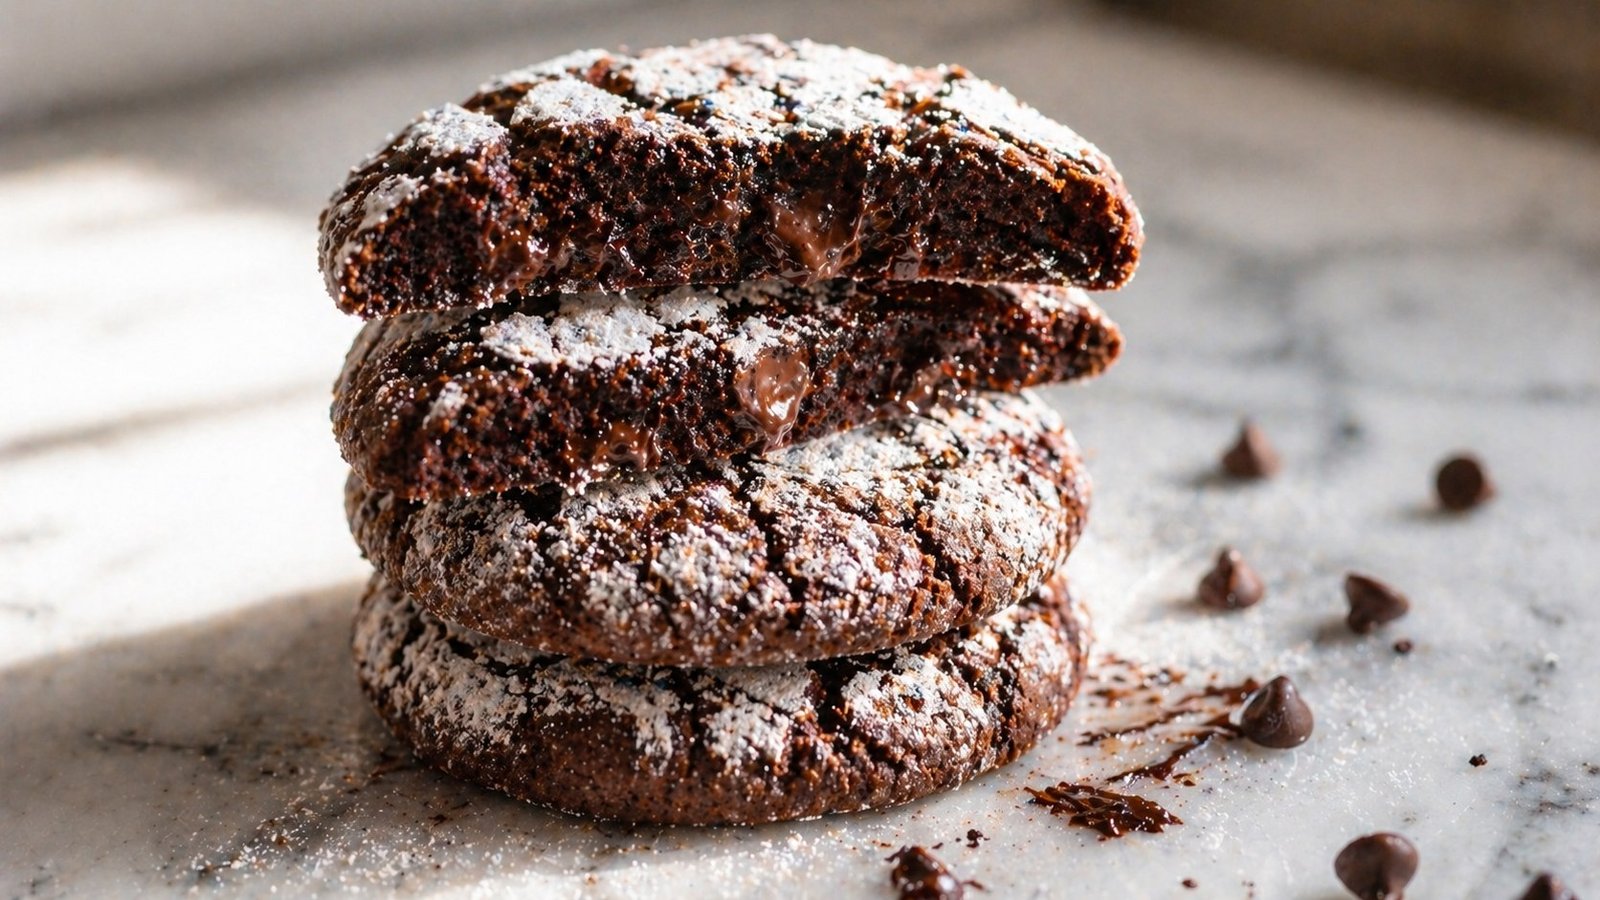
These fudgy brownie cookies have everything you love about a brownie — that dense, gooey center and deep chocolate flavor — but baked into a soft, chewy cookie with the most satisfying crinkle top. One bowl, about 30 minutes, and they look like they came from a bakery.
If you’ve ever stood in the kitchen staring at your pantry, unable to choose between making brownies or cookies — this is the answer. You get both. Same fudgy, rich chocolate interior as a brownie, but in individual cookie form with chewy edges and that papery crinkle crust on top.
I made these for the first time on a rainy Saturday when I couldn’t commit to either. My family went a little wild over them and I’ve been making them on rotation ever since. What makes these different from regular chocolate cookies is the texture — dense and almost fudge-like inside, slightly gooey at the center, with that gorgeous crinkle on top that tells you the batter came together exactly right.
The crinkle isn’t just for looks. It’s a sign the eggs were whipped properly and the cookies baked perfectly. It genuinely feels like a little win every single time.
Why You’ll Love This Recipe
- Brownie texture in cookie form — fudgy center, crinkle top, chewy edges, all of it
- Deep chocolate flavor from real melted chocolate, not just cocoa powder
- That gorgeous crinkle top comes naturally when the batter is right
- Made completely from scratch — not much harder than a box mix, honestly
- Freezer-friendly — make a big batch and you’re set for weeks
- Perfect for gifting — they hold their shape and look beautiful on a plate
- Crowd-pleaser every time — kids, adults, chocolate lovers, everyone wants one
Step-by-Step Instructions
-
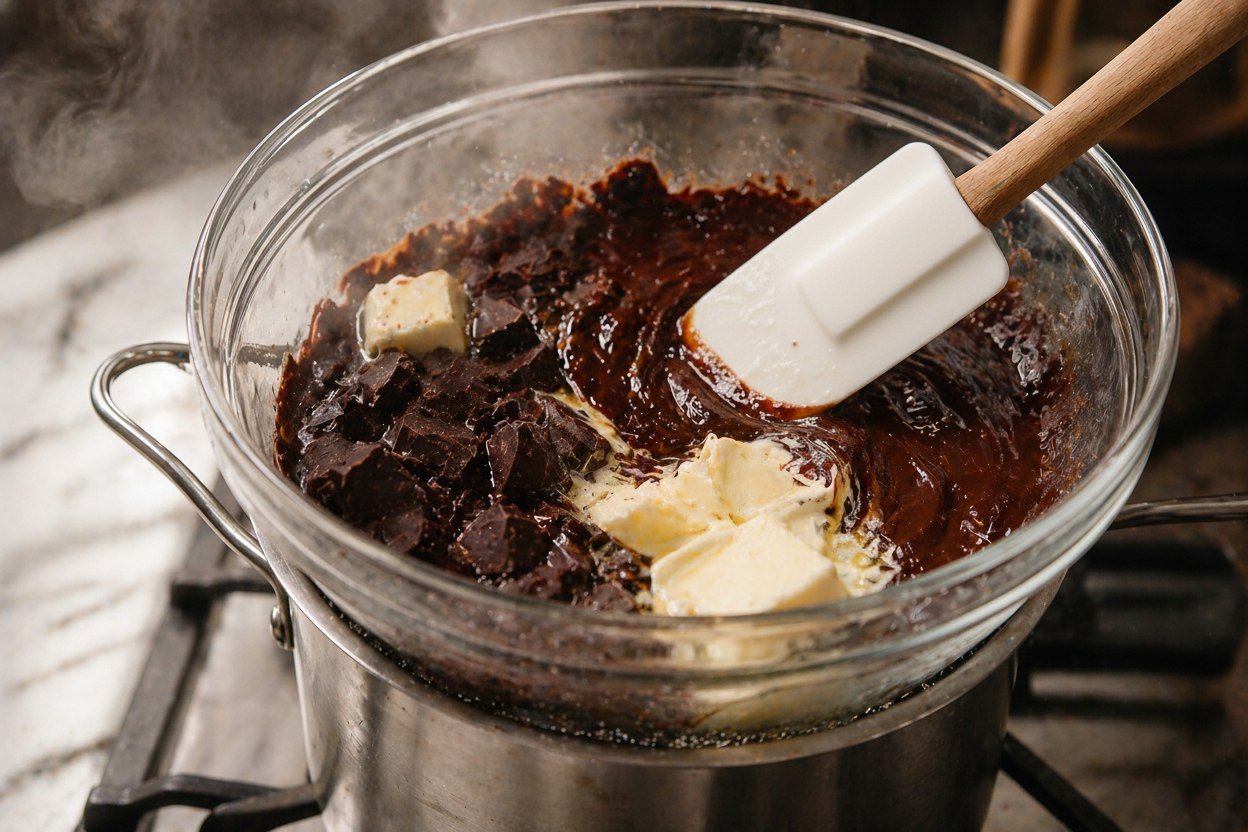
1Melt the chocolate and butter. Set a heatproof bowl over a pot of barely simmering water — the bowl should sit above the water, not touch it. Add the chopped chocolate and butter and stir gently until completely smooth and glossy. Remove from the heat and let it cool for 5–8 minutes. You want it warm, not steaming, before it goes anywhere near the eggs.⚠️ Don’t rush the cooling. If the chocolate is still too hot when you add it to the egg mixture, you’ll scramble the eggs. A few minutes on the counter is all it takes.
-
2Prep your baking sheets. Preheat your oven to 350°F (175°C). Line two baking sheets with parchment paper and set them aside. These cookies are sticky when warm — parchment is not optional here.

-
3Whip the eggs and sugar. In a large bowl, combine the eggs, sugar, and vanilla. Beat on medium-high with a hand mixer or stand mixer for a full 3–4 minutes until the mixture turns pale, very thick, and falls in slow ribbons from the beaters. It should look almost like soft whipped cream.💡 This step is what creates the crinkle top — don’t cut it short. Three to four minutes of proper beating builds the airy layer that forms that papery crust when it bakes. It genuinely makes all the difference.

-
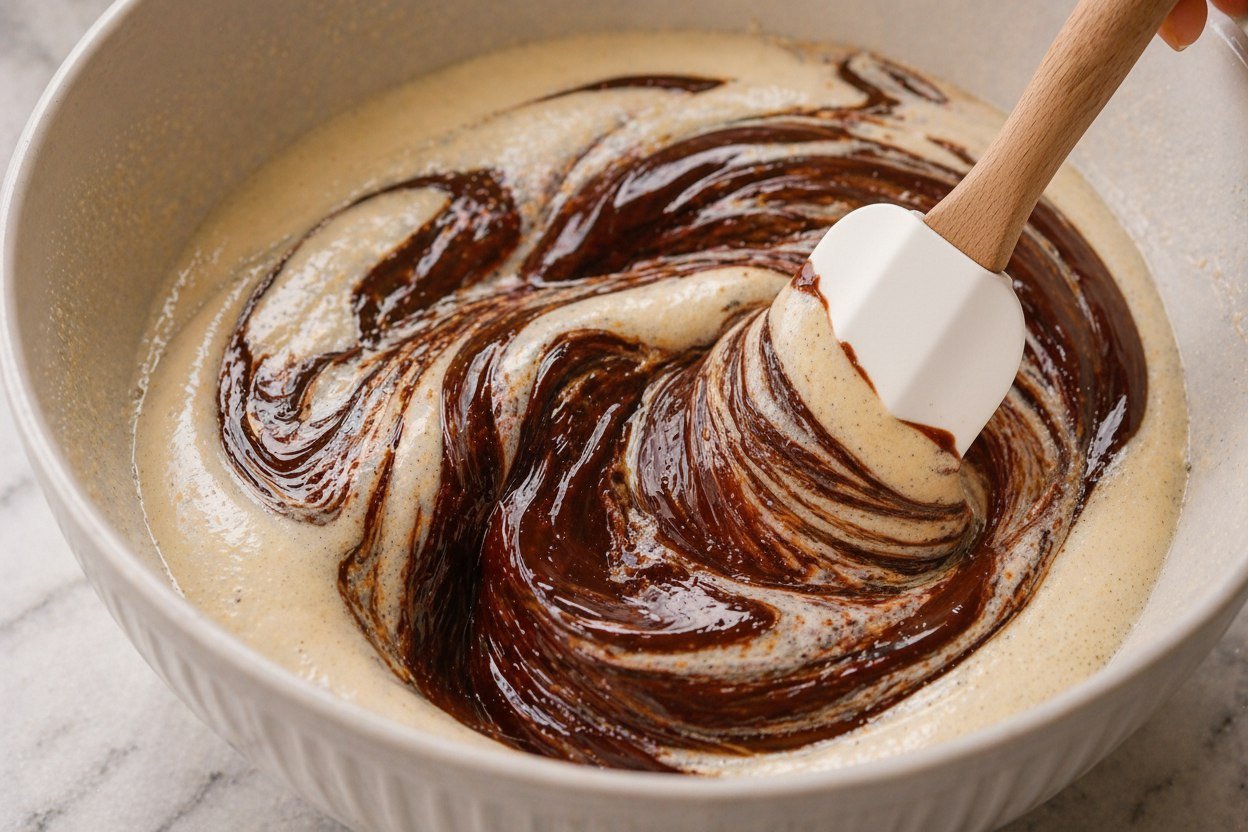
4Fold in the melted chocolate. Pour the cooled chocolate and butter mixture into the whipped egg mixture. Fold gently with a spatula using slow, deliberate strokes — you want to keep as much air as possible from the step before. Keep going until no pale streaks remain.✨ Fold, don’t stir. The swirled dark and light pattern as they come together looks incredible — and means you’re doing it right.
-
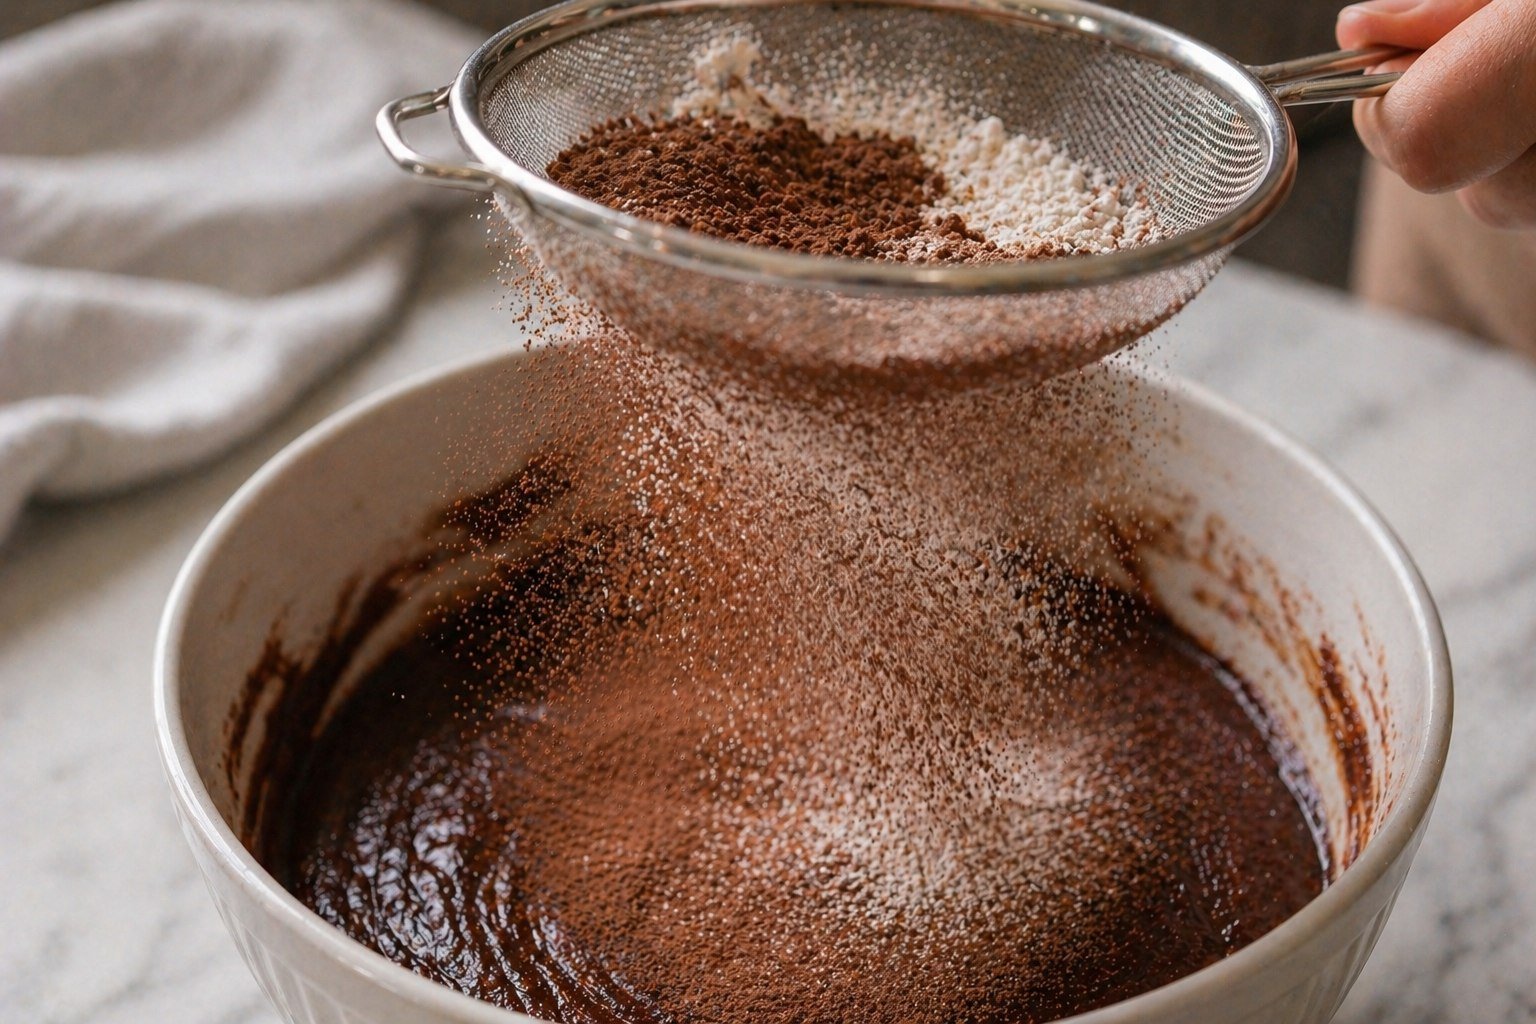
5Sift in the dry ingredients. Hold a fine mesh sieve over the bowl and sift in the flour, cocoa powder, baking powder, and salt all at once. Fold gently with the spatula until no dry streaks remain. Keep using the spatula — no mixer from here on.💡 Sifting isn’t fussy baking — it just breaks up any clumps in the cocoa powder so you don’t get dry pockets in the finished cookie.
-
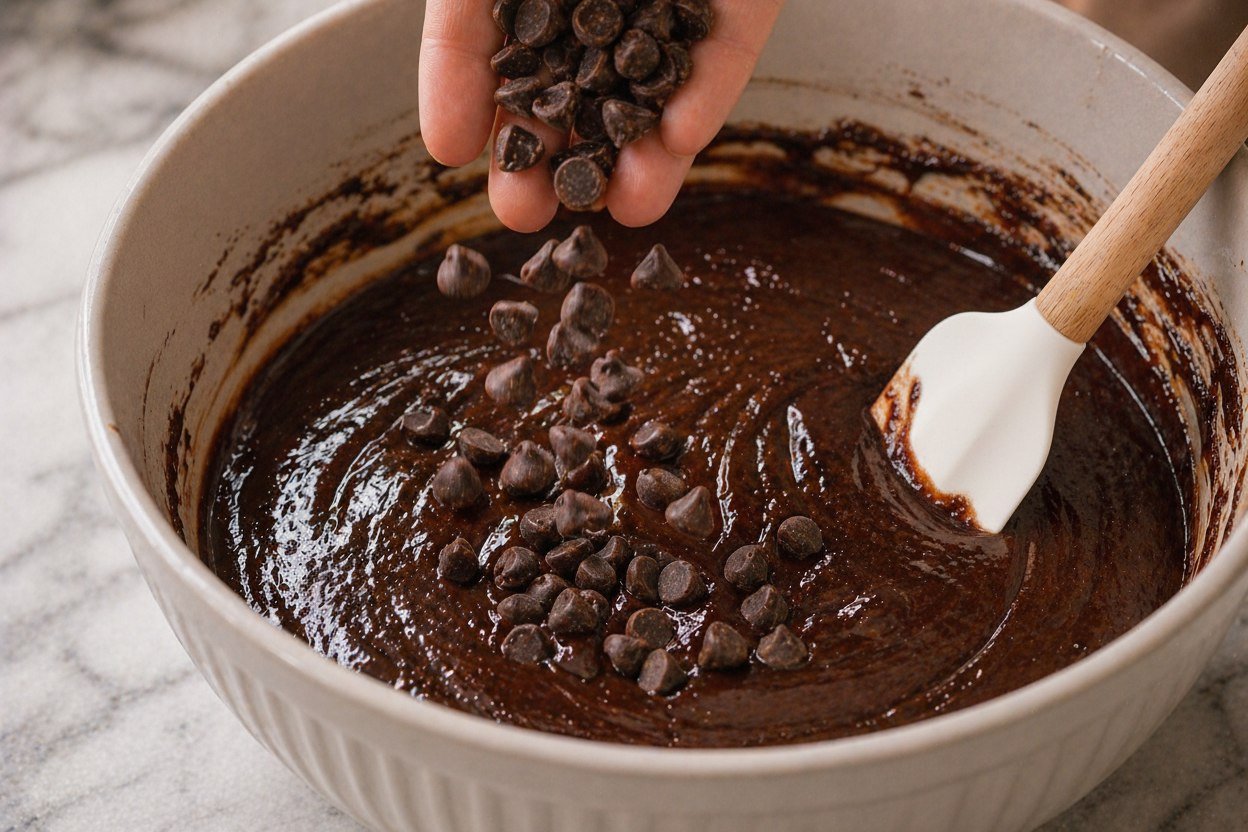
6Fold in the chocolate chips. Drop the extra chips in now and fold them through with the spatula. At this point the batter will look thin, very glossy, and almost pourable. That’s completely normal — it bakes up perfectly.
-
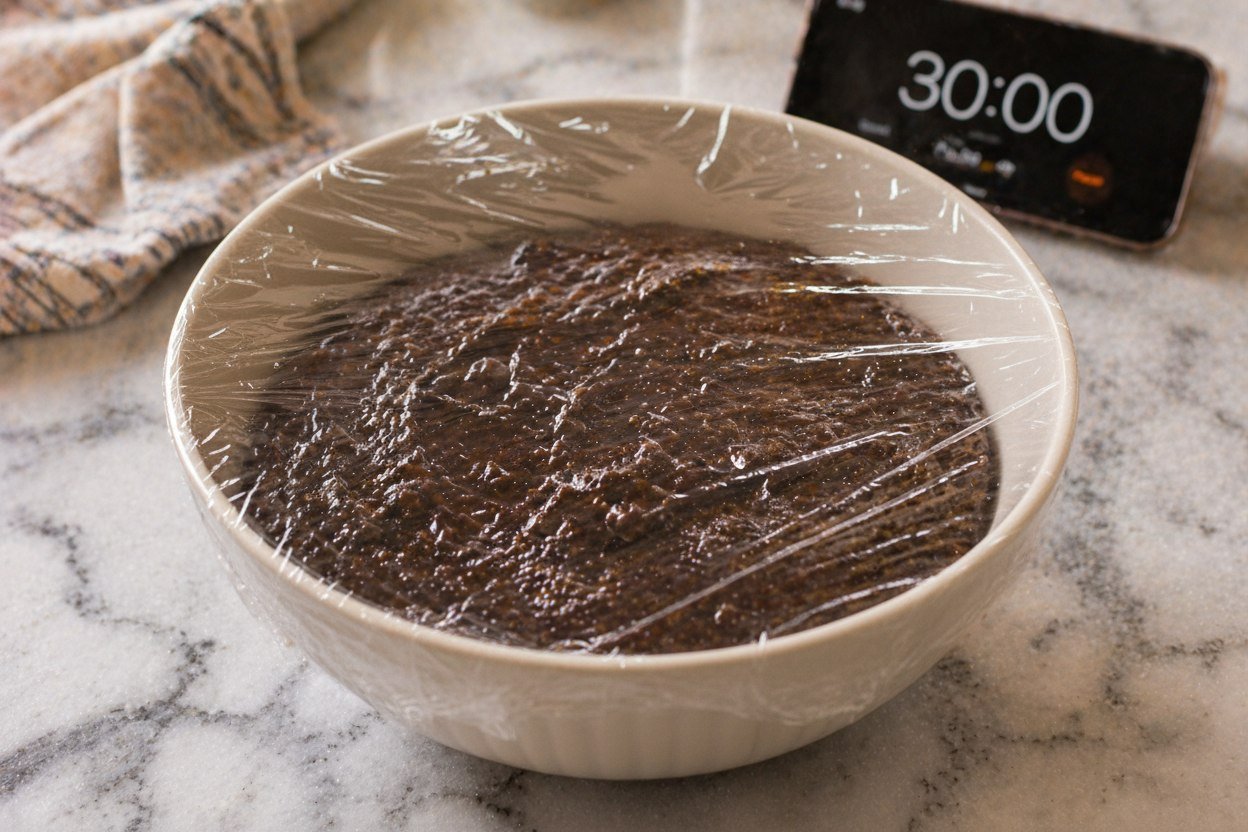
7Rest the batter. Cover the bowl tightly with cling film and let it sit at room temperature for 10–15 minutes to thicken slightly. For the best crinkle tops and thicker cookies, refrigerate for 30 minutes. This step is optional but it genuinely makes a difference.⏱ Cold batter spreads less in the oven, which means taller and fudgier cookies. If your kitchen is warm, skip the counter rest and go straight to the fridge.
-
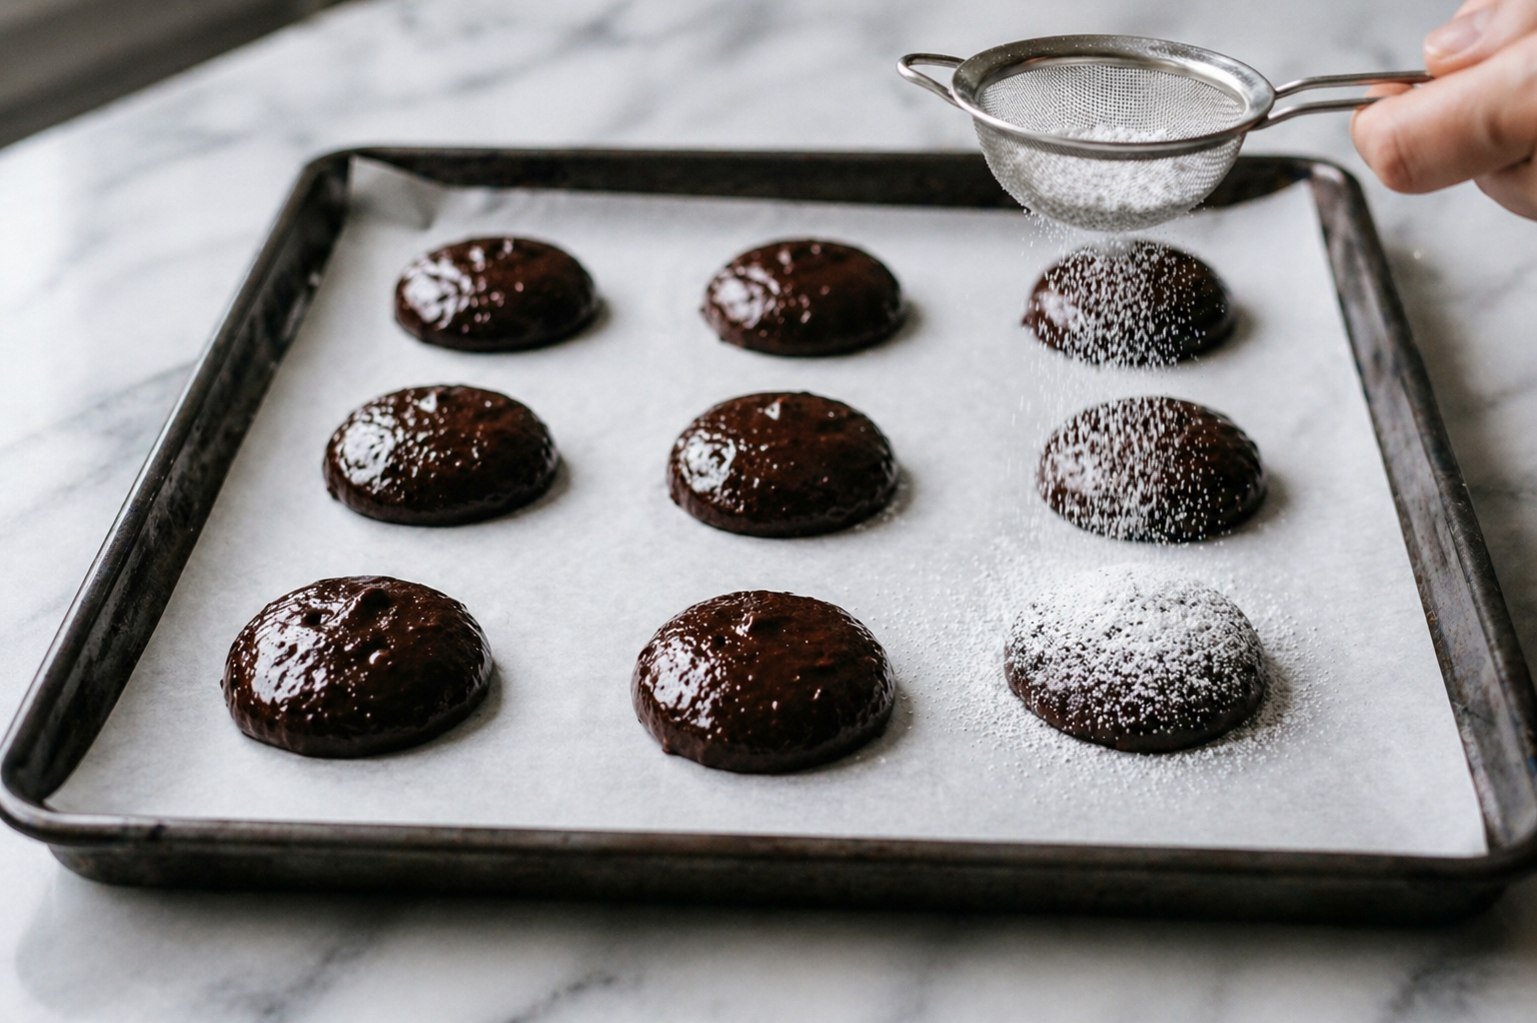
8Scoop and dust. Use a cookie scoop or two spoons to drop rounded tablespoons of batter onto the prepared baking sheets, spacing them about 2 inches apart. For that bakery-style crinkle finish, hold a fine sieve over the tray and dust the tops lightly with powdered sugar just before baking.✨ The powdered sugar dusting is the move — it gives you that beautiful snowy crinkle crust and makes them look like they came straight from a pastry case.
-
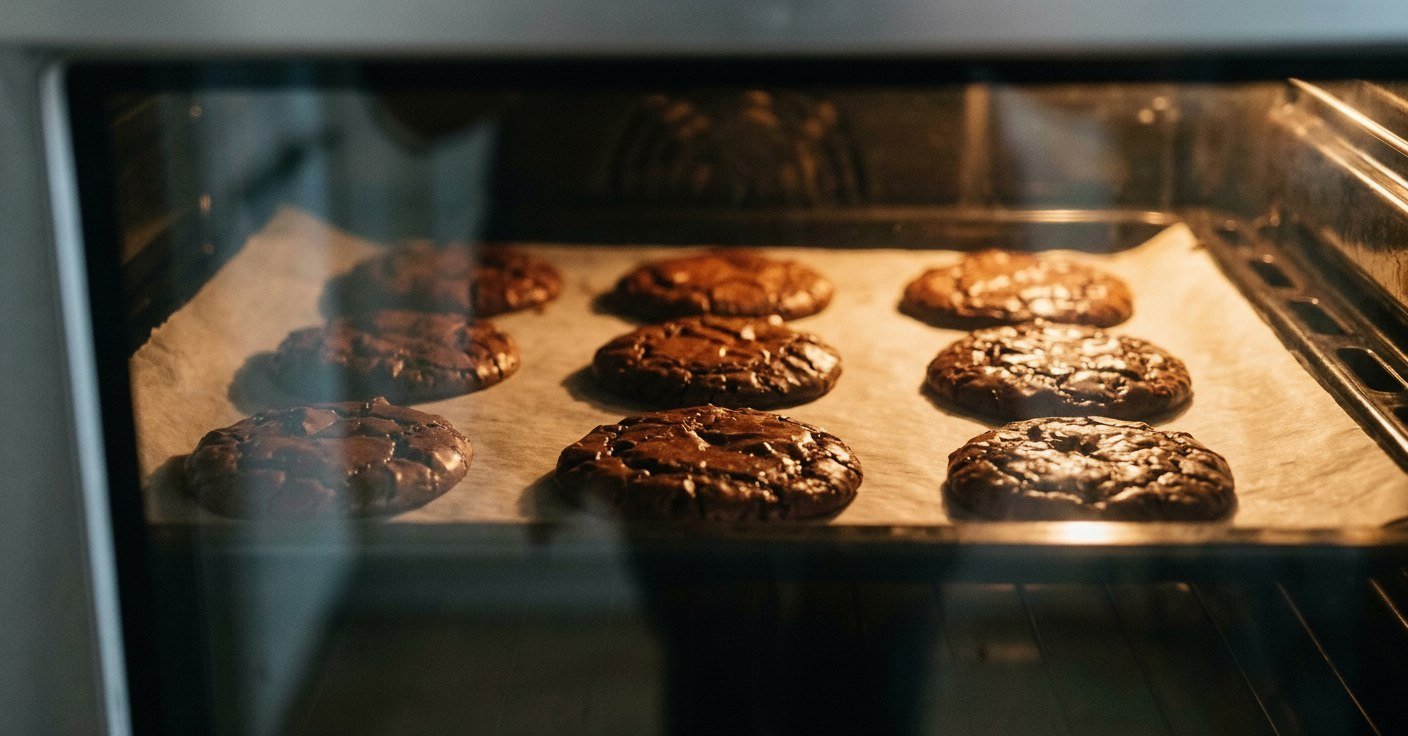
9Bake. Slide the tray into the oven and bake for 10–12 minutes. The edges will look set and slightly matte, but the centers should still appear glossy and a little underdone when you pull them out. That’s exactly right — they finish baking on the hot tray.⚠️ If they look completely set through the oven door, they’re already overbaked. A little wobble in the center is what you want — they firm up as they cool.
-
10Cool on the rack. Let the cookies rest on the baking sheet for 5 full minutes before transferring to a wire rack. They’re fragile when hot — give them the time. Once on the rack, let them cool for another 5–10 minutes. Or break one open immediately and eat it warm. No judgment.
💡 Pro Tips
- Whip the eggs properly — 3 to 4 full minutes until pale and thick. This is the single most important step for crinkle tops. Don’t rush it.
- Cool the chocolate before adding it to the eggs — warm is fine, steaming is not. A few minutes on the counter is all you need.
- Don’t overbake — the centers should still look glossy when you pull them out. They firm up on the hot tray. Overbaked means dry and hard once cooled.
- Chill the batter if it’s spreading too much — 20 to 30 minutes in the fridge gives you taller, thicker, fudgier cookies every time.
- Use good quality chocolate — since it’s the main ingredient, quality makes a real difference. A bar melts smoother and tastes noticeably richer than standard chips.
- Parchment paper is non-negotiable — these cookies are very sticky when warm. Don’t skip it or you’ll regret it.
Variations to Try
Add 1 teaspoon of instant espresso powder with the dry ingredients. It won’t taste like coffee — it just makes the chocolate flavor deeper and more intense. One of my favorite tricks with this recipe.
Cut the recipe in half for about 8–10 cookies. Everything scales down evenly. Perfect when you want something homemade without making a full batch and eating cookies for a week straight.
Make the cookies slightly larger and thinner. Once cooled, sandwich two together with vanilla buttercream or a spoonful of Nutella in the middle. Rich, indulgent, and completely worth it.
Before baking, flatten each scoop and press a caramel square, a Ferrero Rocher, or a spoonful of peanut butter into the center. Fold the dough around it and bake. The surprise inside is everything.
Serving Ideas
- Warm from the oven with a cold glass of milk — the most classic pairing and it never gets old
- Served on a dark plate or wooden board — the contrast makes the powdered sugar really stand out
- Dust with fresh powdered sugar right before serving for that bakery-fresh look
- Crumbled over vanilla ice cream for a warm brownie cookie sundae
- Paired with a hot espresso or cappuccino — the bitterness and richness are made for each other
- Stacked in a small tower and tied with twine for gifting — they travel well and look genuinely beautiful
- On a dessert board alongside fresh strawberries, raspberries, and a small bowl of whipped cream
Storage & Make-Ahead
| What | How long | Notes |
|---|---|---|
| 🍪 Baked cookies | Up to 4 days | Airtight container at room temp, layers separated by parchment |
| 🧊 Baked cookies (frozen) | Up to 2 months | Freeze in a single layer first, then transfer to a sealed bag |
| 🫙 Raw dough balls (frozen) | Up to 2 months | Freeze on a tray then bag — bake straight from frozen, add 2–3 minutes |
| ❄️ Fridge (baked) | Up to 7 days | Bring to room temperature before eating — cold kills the fudgy texture |
| ♨️ Reheating | 10–15 seconds | Microwave a single cookie to bring back that warm gooey center |
Frequently Asked Questions
These fudgy brownie cookies feel a little special every time — not because they’re hard to make, but because they come out looking like something you’d pay for at a bakery. And they’re yours, made in your own kitchen, probably with chocolate all over your hands by the end of it.
I hope the crinkle tops come out perfectly and someone in your house eats one straight off the pan before it’s had a chance to cool. That’s the real sign of success here. 🍫

Get new recipes in your inbox 🍋
No spam — just the good stuff, straight to you.